CRUD application is a common basic system that utilizes data for entries, modification, removal or backup. CRUD stands for Create, Read, Update, and Delete. These names serve as the main features for the authorized user to assess the system with data access and manipulation. These type of systems are contemporary attribute for modern management systems that handle company databases which include products, customers, employees, and other entity records that are essential for the industrial revolution. A simple CRUD system is applied commonly for academic projects or case study as requirements and software training. In this article, you will be guided in developing a quick simple CRUD application in Java that includes a portable database file that can be linked to the application, drag-and-drop technique to create your user interface, and important code lines that are based for Java development. The example program is related to customer management.
Remember to follow the main steps through order so you can benefit a CRUD development in time and other resources. If you are learning this tutorial for an assessment, exam, or even a case study deadline, time-management is essential to accomplish it so a tip is to open the necessary programs already so you can switch easily to applications for your next work, but I suggest this tip for devices with higher specs so currently opened applications won’t bloat your system resources, like memory and CPU, and affect your system performance. Another thing is to setup already your data source with data also included, if you are already given the format and content to fill.
Before we start, you need these programs and files to create the application:
- SQLiteStudio
- Eclipse IDE for Java Developers
- WindowBuilder for Eclipse (tutorial for installation)
- SQLite Connector for Java
Here are the steps in developing a simple CRUD Java application:
1) Setting up database
For this purpose of a CRUD application with minimal requirements to setup, we will be using SQLite. Click on this link to view the tutorial on how to set up database with SQLiteStudio. Now if you have already setup your database with the file, it’s time to create the Java Application.
2) Creating CRUD Java application
In this tutorial, Eclipse IDE will be used for developing the application. It is assumed that you are knowledgeable in using Eclipse and coding with Java, so the tutorial will direct to setting up the Java Project and employ a hybrid MVC framework style.- Open Eclipse IDE and create a Java Project.

- After creating a Java Project with a name (eg. Sample Project), right-click your project and go to Build Path > Configure Build Path.

- Before configuring build path, make sure you have saved the SQLite JDBC Connector in a directory or directly to your project directory so you can easily access it in your work space. Typical name of file would look like this: sqlite-jdbc-<version number>.
- In Build Path dialog, head to Libraries tab and select Add JARs or Add External JARs to locate the SQLite JDBC file and add it to the build path. Click OK to proceed to setting the application.

- You need to create a user interface or UI that is easy to create and maintain by drag-and-drop instead of coding it. After WindowBuilder is installed to Eclipse, we can finally create first a UI to visualize your data representation and control. It will also help you to realize other data entities that needs to be shown for the user and implement the models later. Create a package named ‘ui’ for UI classes. Then create a main UI class for your CRUD application by right-clicking ‘ui’ package, select New > Other. Navigate to WindowBuilder > Swing Designer > Application Window then Next to name your file. In this case, I named it ‘CustomerUI’.

- You will see the source code currently opened in Source tab at the bottom. Click the Design tab right next to it to load the UI designing area and begin dragging components to layout your UI.

- You can now drag components directly to the window shown as it is an absolute layout. You are free to choose other layouts at the Properties or Palette panel and play with the components from how it will look for different layouts. Following is already set with custom variable names and other settings.
 Here is the source code located back at Source tab.
- We leave the partially completed UI later to proceed in creating the data entities as objects to implore Object Oriented Programming. For the sample tutorial, customer is the entity to be created an object in a package named ‘domain’. The following is the sample code that defines Customer class, together with its variables, constructor, and setter and getter methods.
- Next we will create a controller to connect and handle the objects with the UI. Create a package named ‘techserv’ and create a class named ‘CustomerDA’ under the package. The code provided is explanatory through comments provided.
Note: Delete function does not totally delete record from database and applies stamp value from database to inactive to mark it as deleted. This is a basic principle of CRUD to preserve historical data as backup and retrievable.
- Final code setup is to use the CustomerDA data access controller to be linked with the UI to have it dynamic and interactive with the user. Meaning that we will imply controller codes for CustomerUI directly. The code provided applies for the updated CustomerUI again explanatory through comments embedded per code line section.
Complete view of the packages performed and its contents are shown:

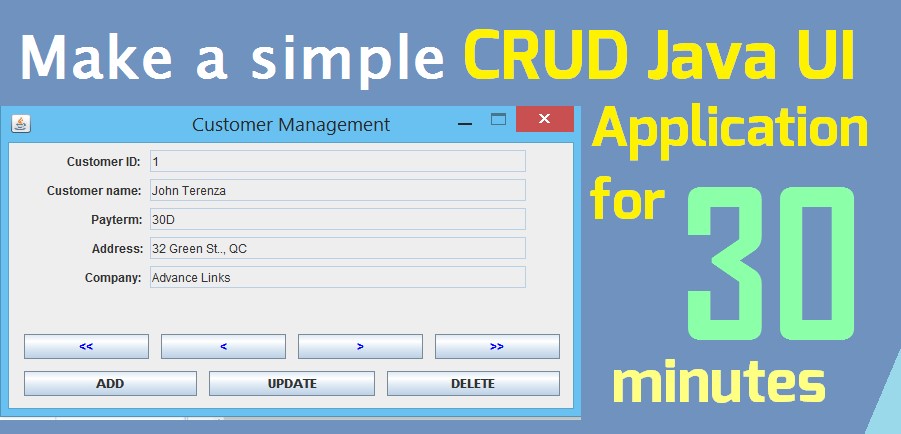
Here is the completed CRUD UI application:

To recap, you have learned a hierarchical process of developing a CRUD Java UI application. You can now implement this by setting up your database for 5 minutes where data was already provided. Java UI setup and configuration for around 3 minutes where WindowBuilder was already installed and usable. Java coding for about 20 minutes with short testing and finalization for 2 minutes which adds up to 30 minutes in total. Hope this tutorial has provided you with basic quick setup of a simple CRUD application and get advance with the knowledge you’ve gained!
You can download the codes in the Github repository.
What other possible techniques should have been applied to make this development faster than the said time?
What other possible techniques should have been applied to make this development faster than the said time?


Create a basic Java Swing application HostBet with a form for adding, viewing, updating, and deleting records,
ReplyDeleteGreat tutorial! The simple CRUD Java UI application was easy to follow and perfect for beginners. I really liked how photosweek clearly each function was explained. It’s a great project to build coding confidence in just 30 minutes. Thanks for sharing such a helpful guide.
ReplyDelete